Below i'll outline my journey from buying a mini on 3/1/23 with 0 knowledge or previous bmw experience and learning how to upgrade/add touchscreen headunit and digital dash. This will serve as a collective of information that i wish was available in one place.
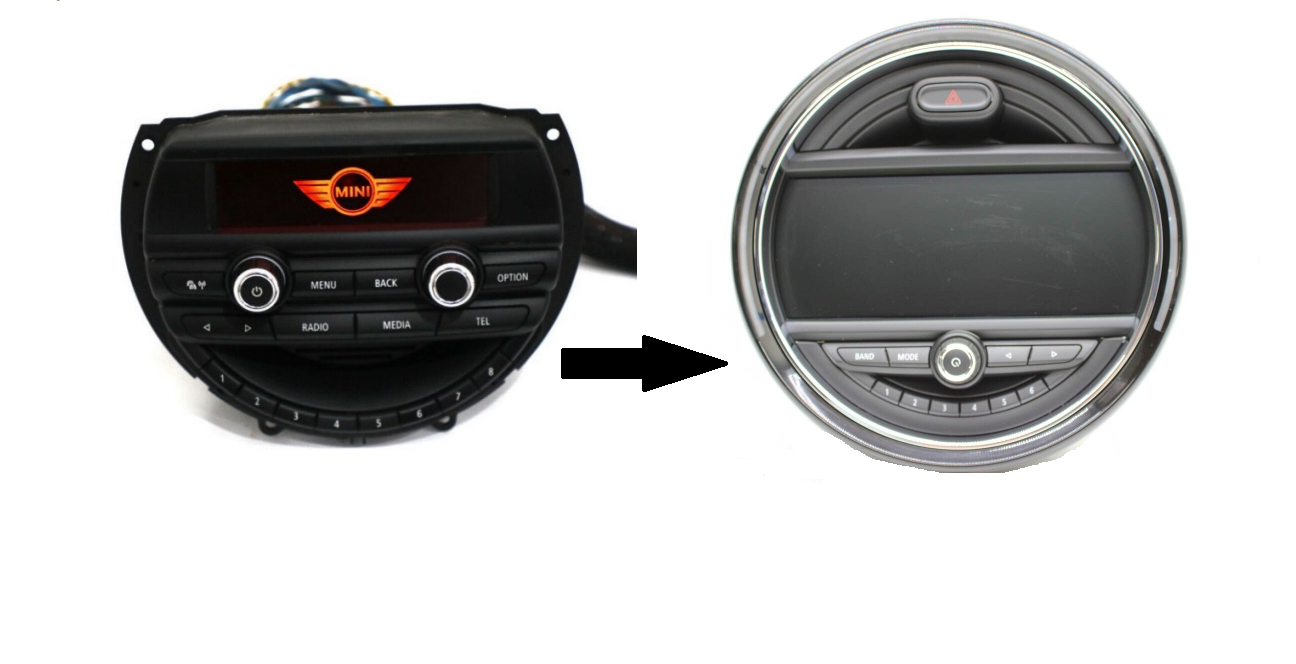
Scope: Update from the base "amber 4-line" Head Unit to Evo ID6 with Carplay and MOST cables to allow digital dash install
Vehicle: 2015 Mini F56 VIN: WMWXM5C58FT939909 HATCHBACK 2 DR 1.5L I3
Current Unit: 4 line amber head unit
Forum Links to successful retrofit on same setup: Here & Here & Here
-Headunit is the module box that sits inside the dash. Amber 4 line base cars have an “all in one” head unit/display screen.
-Display is the screen. This can be non-touch on older NBT/Evo units. Display needs to specifically be labeled "touch"
-Idrive Controller is the mousepad/wheel that goes into the center console area to control the display. You may have a blank out spot or may need to buy a new console to add this in should you want it. (i do not want it. as it is never used when you have touchscreen)
-FSC (activation codes generated for the cars vin to enable nav, carplay, sat radio, etc)
-VO Vehicle Order
-BDC Body Domain Controller (ECU) located on the right side underneath the a-pillar inside the car.
-Before install, flash the headunit to generate and inject FSC, Update the unit, code your vin in and unlock. This can be done “on the bench”. (pay anyone that codes BMWs. I've been in touch with minif56 forum members “Empo” and “SB2002” for this service and have heard great reviews).
-Download and install Esys 3.27. Download AND EXTRACT psdzdata. (you will need at least 400gb of room to handle this job on the laptop)
-Note that you need to flash/code via OABR FIRST (if you are not bench flashing the aforementioned) before OBD coding or you will lock out the unit as described below. Remaining work is done via OBD/ethernet. Coding can be negated via emulator but warrants potential crashing in the future.
-On any windows laptop via adaptors to OBD/ethernet, change the VO to allow Evo head unit via remote coding(from your BMW coder of choice) with head unit installed in the car.
*: USB-C to Ethernet Female. Oabr to Ethernet Cable. OBD to Ethernet for coding via Esys. (a network switch helps, i used this to allow both obd and oabr connection at the same time for flashing.)
: Evo Head unit Any with Hardware number HW 3.1 or above have 4gb and can be updated. This is displayed on the side of the headunit. HW 2.3 2gb units can be used and updated but black screen and crash on updates. (BMW units of HW 3.1 are 4gb but Mini 3.1 are 2gb* need to confirm this)
*: Display, you can use any display with some work and coding. There are 3 styles. NBT (needs coding, voltage regulator to work), Non touch Evo display (similar to touch evo but requires the idrive), Evo Touch screen (best option). Part # 6820386
*: MOST POF Fiber Optic 6WA 6WB Cable Connectors (for Digital Dash)
*: Instrument Cluster Part Number: 62105A49996 (Note this needs to be NEW from Mini) Coding Guide here
2. Put evo id6 in a BMW or MINI car that already have evo unit, activate it there on your vin, inject fsc, etc , then move it to your MINI
3. Put evoid6 on bench and do all the activation , carplay etc on the bench then retrofit NBT
-One is Coding Lock, in a nutshell once it is VO coded with a VO that differs too much from what it was originally coded to it will lock itself, give 'no signal' on the screen and from that point on it can be detected in e-sys but no longer will be able to be coded. This protection can be removed by special means.
-Second is Component Protection, once the Evo is installed in a car with a different VIN your FSC's (activation codes generated for the cars vin to enable nav, carplay, sat radio, etc) it will reject all these codes. That's been this way since the CIC iDrive. Evo's took that a step further, once the fsc's are rejected component protection is triggered and you will not be able to import any fsc's anymore even if they were for the cars vin. Component protection can be removed by uploading a special FSC to the Evo that has the sole purpose to reset the tripped component protection and from there on you can import FSC's again.
-During the coding process you need to be very careful and thoughtful to not trip these anti tampering mechanisms.
-Best is to ditch any emulator and get an FSC set made to your vin
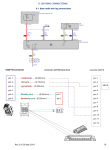
-ethernet is actually called OABR on the Evo. It needs to run from the BDC module to the evo and from the ATM module to the evo. You'll actually need both connections since for component protection to be initialized the first time it needs the OABR connection Evo <-> BDC. Don't hook up an enet cable directly to the OABR, if you do your wiring properly you will be able to do all needed coding and what not via the OBD plug.
-Get yourself an OABR loom from BMW (P/N 61 11 9 372 330) and an ATM retrofit wiring loom from ebay.
-Lay the ATM loom from the trunk to the dash and remove the pins from the pre-installed OABR plug that connects to the evo.
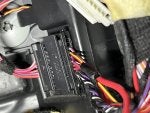
-Install the pins in the OABR plug connected to the loom from BMW. Then run the other end of the OABR loom over to the right side footwell where the BDC module lives. Remove the existing ethernet pins from the smallest connector on the BDC (these ethernet wires go to the quadlock and are not needed anymore) and plug the pins from the OABR loom into the connector on the BDC. That's it for the wiring.
-You'll also need the WLAN antenna for Carplay to work, they are dirt cheap over at BMW (P/N 61 11 9 372 321).
Pricing for my setup: Oabr to ethernet $32.39, Obd to ethernet ENET cable & USB C to Enet $29.14, NBT Evo 3.2 $550.00 (From SB2002), Retrofit cables $140.39, 8.8” Touch Display $701.35. Digital Dash $636.36, MOST cable $21.59, 8 pin BMW cable for Knob/Display buttons $18.35.
Parts: $2379.57
Remote coding: $250
Grand Total: $2529.57
![Image]()
Scope: Update from the base "amber 4-line" Head Unit to Evo ID6 with Carplay and MOST cables to allow digital dash install
Vehicle: 2015 Mini F56 VIN: WMWXM5C58FT939909 HATCHBACK 2 DR 1.5L I3
Current Unit: 4 line amber head unit
Forum Links to successful retrofit on same setup: Here & Here & Here
Relevant notes:
-3rd Gen Mini Lingo. 2014-2018 is pre-LCI, 2019-2021 is LCI, LCI2 is 2022-current.-Headunit is the module box that sits inside the dash. Amber 4 line base cars have an “all in one” head unit/display screen.
-Display is the screen. This can be non-touch on older NBT/Evo units. Display needs to specifically be labeled "touch"
-Idrive Controller is the mousepad/wheel that goes into the center console area to control the display. You may have a blank out spot or may need to buy a new console to add this in should you want it. (i do not want it. as it is never used when you have touchscreen)
-FSC (activation codes generated for the cars vin to enable nav, carplay, sat radio, etc)
-VO Vehicle Order
-BDC Body Domain Controller (ECU) located on the right side underneath the a-pillar inside the car.
-Before install, flash the headunit to generate and inject FSC, Update the unit, code your vin in and unlock. This can be done “on the bench”. (pay anyone that codes BMWs. I've been in touch with minif56 forum members “Empo” and “SB2002” for this service and have heard great reviews).
-Download and install Esys 3.27. Download AND EXTRACT psdzdata. (you will need at least 400gb of room to handle this job on the laptop)
-Note that you need to flash/code via OABR FIRST (if you are not bench flashing the aforementioned) before OBD coding or you will lock out the unit as described below. Remaining work is done via OBD/ethernet. Coding can be negated via emulator but warrants potential crashing in the future.
-On any windows laptop via adaptors to OBD/ethernet, change the VO to allow Evo head unit via remote coding(from your BMW coder of choice) with head unit installed in the car.
Cables/Parts List:
*: Antennas for GPS(if you have it, not needed if you will be using carplay), BT & Wifi antennas, 8-pin wiring harness for Evo buttons on display.*: USB-C to Ethernet Female. Oabr to Ethernet Cable. OBD to Ethernet for coding via Esys. (a network switch helps, i used this to allow both obd and oabr connection at the same time for flashing.)
: Evo Head unit Any with Hardware number HW 3.1 or above have 4gb and can be updated. This is displayed on the side of the headunit. HW 2.3 2gb units can be used and updated but black screen and crash on updates. (BMW units of HW 3.1 are 4gb but Mini 3.1 are 2gb* need to confirm this)
*: Display, you can use any display with some work and coding. There are 3 styles. NBT (needs coding, voltage regulator to work), Non touch Evo display (similar to touch evo but requires the idrive), Evo Touch screen (best option). Part # 6820386
*: MOST POF Fiber Optic 6WA 6WB Cable Connectors (for Digital Dash)
*: Instrument Cluster Part Number: 62105A49996 (Note this needs to be NEW from Mini) Coding Guide here
3 options for retro:
1. Put evo id6 replacing NBT and you need to pull out from the quadlock the Ethernet wires to create a OABR plug. Then u can code it, activate CarPlay etc..,2. Put evo id6 in a BMW or MINI car that already have evo unit, activate it there on your vin, inject fsc, etc , then move it to your MINI
3. Put evoid6 on bench and do all the activation , carplay etc on the bench then retrofit NBT
*Comment from BMW electronics specialist with relevance:
-NBT Evo has 2 kinds of anti theft / anti tampering mechanisms.-One is Coding Lock, in a nutshell once it is VO coded with a VO that differs too much from what it was originally coded to it will lock itself, give 'no signal' on the screen and from that point on it can be detected in e-sys but no longer will be able to be coded. This protection can be removed by special means.
-Second is Component Protection, once the Evo is installed in a car with a different VIN your FSC's (activation codes generated for the cars vin to enable nav, carplay, sat radio, etc) it will reject all these codes. That's been this way since the CIC iDrive. Evo's took that a step further, once the fsc's are rejected component protection is triggered and you will not be able to import any fsc's anymore even if they were for the cars vin. Component protection can be removed by uploading a special FSC to the Evo that has the sole purpose to reset the tripped component protection and from there on you can import FSC's again.
-During the coding process you need to be very careful and thoughtful to not trip these anti tampering mechanisms.
-Best is to ditch any emulator and get an FSC set made to your vin
-ethernet is actually called OABR on the Evo. It needs to run from the BDC module to the evo and from the ATM module to the evo. You'll actually need both connections since for component protection to be initialized the first time it needs the OABR connection Evo <-> BDC. Don't hook up an enet cable directly to the OABR, if you do your wiring properly you will be able to do all needed coding and what not via the OBD plug.
-Get yourself an OABR loom from BMW (P/N 61 11 9 372 330) and an ATM retrofit wiring loom from ebay.
-Lay the ATM loom from the trunk to the dash and remove the pins from the pre-installed OABR plug that connects to the evo.
-Install the pins in the OABR plug connected to the loom from BMW. Then run the other end of the OABR loom over to the right side footwell where the BDC module lives. Remove the existing ethernet pins from the smallest connector on the BDC (these ethernet wires go to the quadlock and are not needed anymore) and plug the pins from the OABR loom into the connector on the BDC. That's it for the wiring.
-You'll also need the WLAN antenna for Carplay to work, they are dirt cheap over at BMW (P/N 61 11 9 372 321).
Pricing for my setup: Oabr to ethernet $32.39, Obd to ethernet ENET cable & USB C to Enet $29.14, NBT Evo 3.2 $550.00 (From SB2002), Retrofit cables $140.39, 8.8” Touch Display $701.35. Digital Dash $636.36, MOST cable $21.59, 8 pin BMW cable for Knob/Display buttons $18.35.
Parts: $2379.57
Remote coding: $250
Grand Total: $2529.57